|
Setting Material Properties |
  
|
|
Setting Material Properties |
|
When you create the first shape of a new project, the Material Properties dialog is automatically displayed if no default material has been previously specified. The material properties that you select will be used for all subsequent shapes added in the same project. If you are building composite sections, you will have to explicitly set material properties to shapes whose material is not the same as the first shape.
To assign material properties to a shape, from the Drawing and Data tab, select a shape (see “Selecting Shapes and Holes”). From the Shape menu select the Properties/Material… option.

The Material Properties dialog is displayed. Select the Shape Materials tab
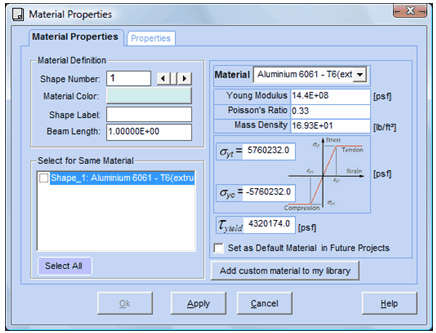
Select the shape to which you want to assign a material using the Shape Number scrollbar. By defaults, the shape that was selected to display the dialog is selected. The selected shape is highlighted in red in the drawing area.
Select the material color by clicking on the Material Color button. The button is displayed using the current material color. The color is assigned to the shape material. All shapes using this material will be affected by this change. To view shape colors, from the toolbar click the Show and Hide Shape Colors icon. ![]()
The shape Label is displayed and may be modified. Enter the Beam Length. The default value is 1.0 one giving unit length values for properties such as mass, volume… Select the material type using the Material Type selection dropdown. The material properties are displayed.
If you want to use the same material type for other shapes, check the shapes in the Select for Same Material list. Click Apply to commit the current changes and keep the dialog open. Click OK to commit the current changes and close the dialog. Click Cancel to abort changes made since the last Apply and close the dialog.
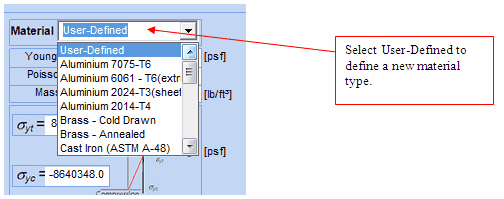
If you work with a material whose properties are not listed, you may define a new material type and add it to the list of materials. To do this, select the User-Defined material type from the Material dropdown. When this option is selected, you may enter user-defined values for material properties. Enter the following material properties: Material Name, Young’s Modulus, Poisson Ratio, Mass Density and Yield Stresses. Young’s Modulus, Poisson Ratio and Yield Stresses are used only in section analysis (not used for geometric property computation).
Click the Add Custom Material to My Library button. You will be prompted for the material name.

Click the OK button and the newly defined material appears in the Material list.
If you always work with the same material, you may set the default material for all shapes by checking the Set as Default Material in Future Projects checkbox.
At anytime you may select the Material Properties tab to get an overall view of material properties. If you do not explicitly define the material type, it defaults to the first material in the material database.
The values in the material database provided in ShapeDesigner are average values or approximations of material coefficients. Exact values may vary greatly, depending on composition, heat treatment, and mechanical working. Therefore, the tables should be used only for educational purposes. For professional practice, obtain material properties from the supplier of materials.